Tired of staring at dull, lifeless concrete in your backyard or balcony? Good news—you can turn that hard surface into a soft, lush space with artificial grass, and the process is easier than you might think. Whether you’re tackling a full patio makeover or just sprucing up a small corner, this guide shows you exactly how to do it.
We’ll start with the tools and materials you’ll need, then walk you through each step of the installation—from prepping your surface and cutting turf to applying adhesive and securing edges. You’ll also learn what kind of glue works best, how to improve drainage, and practical tips to avoid common DIY mistakes. Wondering if you can skip the glue altogether? We’ll cover that too.
By the end, you’ll know what to expect from your new concrete turf—and why it might be one of the smartest upgrades you’ve made to your outdoor space.
How to Install Artificial Grass on Concrete
Installing artificial grass on concrete may seem complicated, but with the right approach, you can get clean, long-lasting results. This step-by-step guide walks you through the entire process—from surface prep and cutting to gluing and edge finishing—so even if you’ve never done it before, you’ll know exactly what to do.
Tools and Materials You’ll Need
Make sure you have these essentials before you start:
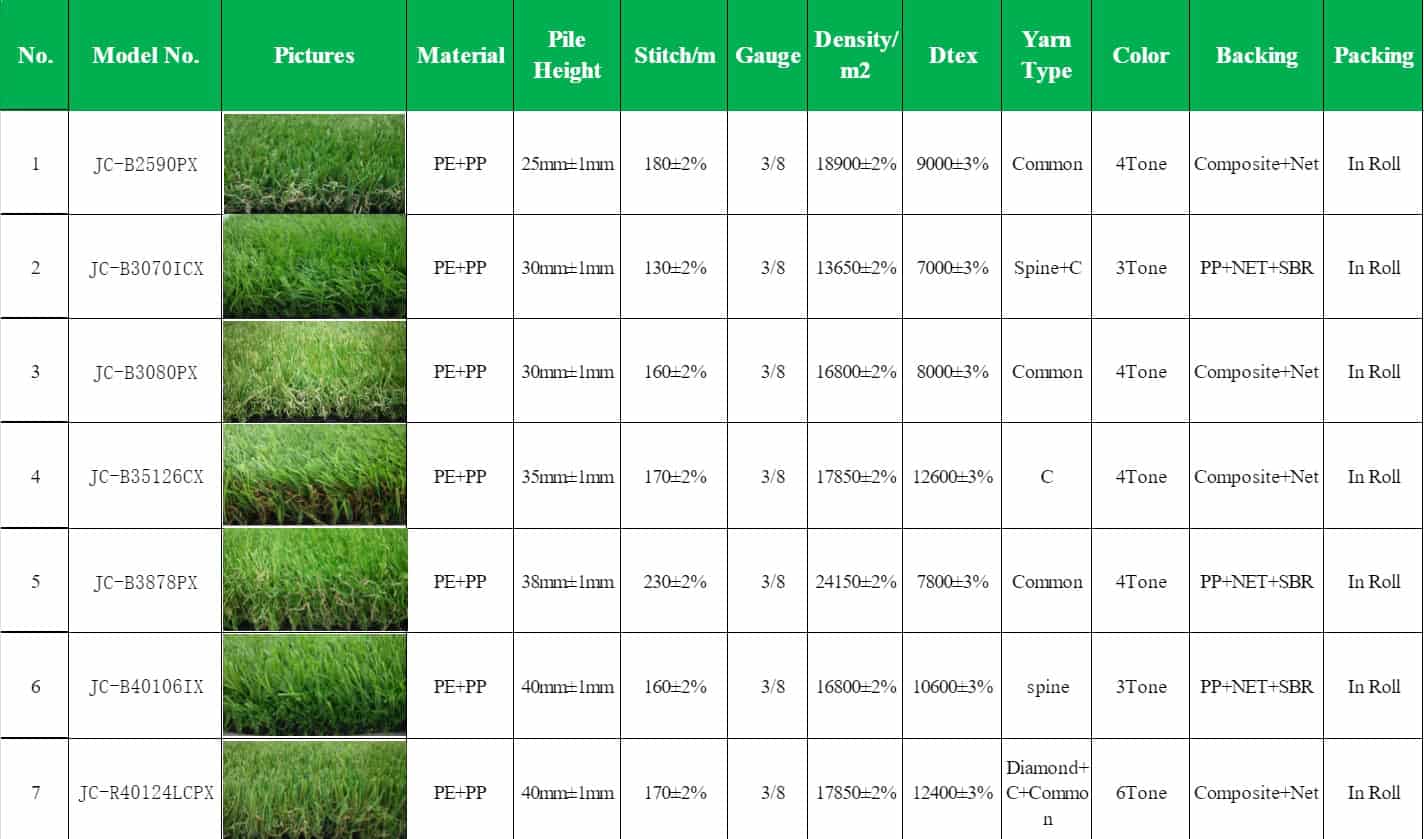
- Artificial grass roll(s)
- Outdoor adhesive (polyurethane or solvent-based)
- Seaming tape
- Utility knife (with spare blades)
- Measuring tape and chalk line
- Notched trowel or adhesive roller
- Broom or power brush
- Optional:
- Self-leveling concrete compound (for crack repair)
- Shock pad or drainage mat
- Edging strips or glued-down borders
- Heavy objects or floor roller (for pressing seams)
- Protective gloves
- Galvanized U-pins (only if usable in gaps or drilled areas)
- Masking tape (for layout adjustments)
Step 1: Clean, Level, and Prep the Concrete Surface
Start with a clean, dry surface. Sweep away all dust and debris—especially in corners and cracks. Remove any grease or oil stains with a degreaser, as they can weaken the glue bond.
If the concrete is cracked or uneven, use a self-leveling compound to smooth it out. These are available at most hardware or DIY stores and are easy to apply with a trowel or squeegee.
Check if the surface has a slight slope (1–2%) to help water run off instead of pooling under the turf. You can use a spirit level or pour water to test.
For shaded or damp areas, spray an outdoor anti-mold treatment on the surface before installation. This prevents future mildew from forming beneath the turf.
If the concrete is too smooth (like polished garage floors), lightly sanding the surface will improve adhesive grip.

Step 2: Measure, Lay Out, and Cut the Artificial Grass
Before you cut anything, measure the total area and plan how you’ll lay out the turf to minimize seams. It’s best to start from one side and work your way across in a single direction.
Roll out your turf fully and let it sit under the sun for 1–2 hours. This helps the material relax and removes any wrinkles or curls from being rolled. If it’s cloudy or cold, you may need more time.
Use a chalk line and a measuring tape to mark your cutting lines. If you haven’t used a chalk line before, it’s a simple tool that snaps a straight line across a surface. Always cut from the back side of the turf to avoid damaging the blades and to get a cleaner edge.
Leave 1–2 cm of extra material around the edges. You can trim this off later during final fitting. Most importantly, make sure all turf pieces face the same direction. If they don’t, the grass will reflect light differently, and you’ll see visible shading differences between sections. For best results, have the blades point toward your main viewing angle—like a patio door or window.

Step 3: Apply Adhesive or Tape to Turf Edges and Seams
Apply adhesive around the perimeter and along all seams—don’t cover the entire surface. Full coverage can trap moisture and waste glue. Focus only on the contact points.
Use a notched trowel (3–5 mm) or a glue roller to spread the adhesive evenly. For best results, wait a few minutes after applying glue before placing the turf. This helps avoid slippage while positioning.
Work in dry, mild conditions—ideally between 10–30°C (50–85°F). Too much heat or humidity can prevent the glue from bonding properly.
Use polyurethane-based or artificial turf adhesive only. General-purpose glues may not hold over time, especially outdoors.
If you’re using turf tape instead of glue, place it under the seam line with the adhesive side facing up. Make sure the surface is dry and clean before pressing the turf down.

Step 4 – Align and Join Turf Seams
Start by trimming off the factory edges on each panel. These machine-cut edges are often uneven and can cause a visible ridge. Use a sharp utility knife and cut from the back side of the turf for better control.

Leave a small gap—around 2–3 mm—between each piece. This allows for slight expansion in heat and helps prevent lifting over time.
Place the seaming tape centered under the joint with the adhesive side facing up. Apply glue to the tape, not the turf. Align the edges carefully and press them together, keeping the grass blades running in the same direction.
Use a floor roller or place heavy objects (15–20 kg) over the seam to apply pressure evenly. This helps the glue bond deeply into the turf backing.
Pro Tip: Before pressing the turf down permanently, gently lift the edges and check the seam from above. Make sure the grass blades align evenly and the joint isn’t visible from normal viewing angles. A few seconds of checking can save you from a permanent mismatch.
Let the joint cure for 2–4 hours before stepping on it. In damp or cooler conditions, waiting longer is better.
Step 5 – Brush, Trim, and Secure the Turf
Once the turf is in place, brush it thoroughly against the grain using a stiff broom or power brush. This lifts the grass blades upright and helps restore their natural position after being rolled. It also reduces the visibility of seams. For best results, brush before the glue has fully set.

Trim any excess turf along the edges using a sharp utility knife. Work slowly and carefully to avoid tearing the backing or cutting uneven lines.
Now it’s time to secure the edges. You have a few options:
- Adhesive perimeter sealing: Apply a continuous line of outdoor glue along all outer edges.
- Edging strips: Use glued-down or bolted PVC or metal edging for a neat, durable finish.
- Galvanized U-pins: Only suitable if there are joints or cracks in the concrete to anchor into.

Press all borders and corners down firmly to ensure they stay in place as the glue cures. Make sure all turf sections still face the same direction for a seamless look.
Let the installation sit undisturbed for 24 hours if possible. This gives the glue time to fully harden and improves long-term durability.
Add Infill or Shock Pad (Optional)

Adding infill and/or a shock pad isn’t strictly required—but it can greatly improve performance, comfort, and durability.
Infill helps weigh the turf down, keeps the blades standing upright, and improves drainage and heat resistance. For most residential setups on concrete, silica sand is the go-to choice. Spread 5–8 kg per square meter for even coverage. Use a broom or power brush to work it into the turf evenly.
Rubber infill adds softness and cushion underfoot, which is ideal for play areas or pet zones. Just note that it may get hotter in direct sunlight compared to sand.
If you’re installing turf on a balcony, rooftop, or any hard surface with poor drainage, consider adding a shock pad before laying the turf. These foam underlay layers help with impact absorption and promote water flow. Shock pads should be laid and fixed directly on the concrete, before you start cutting and gluing the turf.
Can I Just Lay Artificial Grass on Concrete Without Preparation?
You could, but it won’t last. Skipping surface prep or adhesive might save time now, but it leads to wrinkling, shifting, or pooling later. Proper prep ensures your turf looks good and stays in place for years.
What is the Best Adhesive for Artificial Grass to Concrete?
The best adhesive for artificial grass to concrete is a polyurethane-based outdoor turf glue. This is a two-part adhesive that you mix before use. It forms a strong, weather-resistant bond and stays flexible in heat, rain, or cold—perfect for large outdoor areas.
If you’re working in moderate climates or on a small patio or balcony, a high-quality acrylic adhesive can also work well. It’s easier to apply and gives you more time to adjust turf placement before it sets. But it’s not ideal for high-traffic zones or extreme temperatures.
Avoid carpet glue, indoor flooring adhesive, or general construction glue. They aren’t designed for artificial grass and will fail quickly—especially in outdoor conditions.
Apply adhesive only in dry weather, ideally between 10–30°C (50–85°F). Always check the curing time on the label, and let it set fully before using the area. For seams, use seaming tape underneath to keep edges tightly joined.
Most turf glues are sold in cans or kits. Some polyurethane products come in two parts that must be mixed before applying. You can find these adhesives at most hardware stores or turf suppliers.
How to Add Drainage for Artificial Grass on Concrete
Concrete doesn’t drain water on its own, so if you install artificial grass directly on it, you may end up with water pooling—especially during rain.
To fix this, you have a few simple options.
First, check if your concrete surface already has a slope. Even a slight tilt (1–2%) can help water run off to the edges.
If there’s no slope or water tends to collect, you can drill a few small drainage holes in low areas of the concrete. Just make sure they lead to soil or a place where water can escape underneath.
Another effective solution is to lay a shock pad or drainage mat under the turf. These padded underlays have small channels that let water flow underneath and out to the sides. They also add comfort and insulation—great for balconies or rooftops.

If your area is covered or rarely sees rain, you might not need extra drainage—but it’s always safer to plan for it. Just make sure water has a way out from under your turf, and it’ll last much longer.
Tips for a Successful DIY Artificial Grass Installation on Concrete
If you’re installing artificial grass on concrete yourself, these quick tips can help you avoid common mistakes and get better results:
- Clean and test a small area first. Wipe down a spot on the concrete and try your adhesive on it. This helps you see how it sticks and confirms the surface is ready.
- Make sure the surface is clean and even. Don’t install turf over dirt, loose dust, or cracks. It weakens the glue and creates bumps under the grass.
- Let the turf relax before cutting. Unroll it and leave it under the sun for at least an hour. This helps remove wrinkles and makes it easier to trim and position.
- Measure twice, cut once. Always double-check your layout and leave a small buffer around the edges for adjustments.
- Dry-fit everything before gluing. Lay out the full area first without adhesive. This gives you a chance to check the alignment and make adjustments before it’s permanent.
- Align the grass blades in the same direction. Mismatched pile direction causes visible shading and uneven seams—even if the cut is perfect.
- Install in dry, mild weather. Humidity or extreme temperatures can weaken the glue. Don’t skip the curing time—wait at least 24 hours before using the turf.

Can You Install Artificial Grass on Concrete Without Glue?
Yes, you can install artificial grass on concrete without glue, but only in limited cases. This method is often used for small, lightweight areas—like a balcony or portable patch—where the turf isn’t subject to heavy foot traffic or strong wind.
Instead of adhesive, people use double-sided tape, sandbags, turf pins along the edges, or simply let the furniture weigh it down. However, without glue, the turf may shift, curl, or wrinkle over time, especially in larger areas.
For most outdoor spaces or long-term use, professional-grade adhesive gives a stronger bond and cleaner finish. If you want a stable and lasting result, glue is still the best option.
Final Thoughts: What to Expect from Your Concrete Turf Installation
So, you’re almost there. You’ve got the tools, you know the steps, and guess what? It’s not as complicated as it first looked. Laying artificial grass on concrete isn’t rocket science—it just takes a little care, and you’re good.
Picture this: your old patio, now a soft green space where you can kick off your shoes, sip your coffee, or let the dog stretch out in the sun. No mowing. No mud. No mess. Just a clean, comfy surface that actually makes you want to spend more time outside.
You’ve made it this far. The hardest part? Probably just deciding to start. The rest is green from here.
And if you ever feel unsure along the way, just know—we’re always here to help. Whether you’re DIYing it or calling in the pros, we’re rooting for your turf transformation.