Installing artificial grass for dogs isn’t hard—but it does take the right prep, the right materials, and a few dog-specific tricks. Whether you’re tired of muddy paws or you just want a cleaner play space, this guide walks you through the full DIY process.
We’ll start by showing you the tools you need, then step through each stage—from ground prep and base building, to cutting, seaming, and securing turf the right way. You’ll learn when to use infill (and when not to), how to avoid common mistakes, and what turf features matter most for odor control, drainage, and durability. By the end, you’ll be ready to install a long-lasting, pet-friendly lawn your dog—and you—will love.
Tools and Materials You’ll Need Before You Start
Before you install artificial grass for your dog, you need the right tools. The right setup helps ensure clean seams, good drainage, and a secure surface that stands up to pet activity.
Here’s a quick list to guide your prep:
| Item | Purpose / Use |
| Artificial grass rolls | Main surface, choose pet-friendly with drainage |
| Utility knife | Cutting edges and trimming around obstacles |
| Measuring tape or chalk line | Marking cut lines and aligning turf layout |
| Shovel or flat spade | Clearing grass, soil and leveling uneven surfaces |
| Weed barrier fabric | Blocks weeds from growing through the turf |
| Crushed stone or granite base | Forms a stable, well-draining sub-base |
| Plate compactor or hand tamper | Compacts base material to prevent future sinking |
| Turf adhesive or seam tape | Joins turf sections together without bumps |
| Turf nails or landscape staples | Secures turf to ground and edges |
| Stiff broom or turf rake | Fluffs up blades for a natural, upright look |
Step 1: Prepare the Ground for Dog-Friendly Turf Installation
A clean, stable ground is the base of any successful pet turf install. Start by removing all grass, weeds, roots, rocks, and debris. Use a shovel to dig 2–3 inches deep, especially if there are stubborn roots or uneven patches. This gives your turf a fresh, level foundation.
Next, shape the surface to create a slight slope—about 1–2%—to guide water away from your home, fence lines, or dog shelters. This helps prevent puddles and odor buildup. If you’re unsure, use a straight board and a level to check the grade.
Finish by compacting the soil with a plate compactor or hand tamper. The surface should feel firm underfoot and leave no footprints when stepped on. For larger areas, use a plate compactor. A hand tamper works fine for smaller spots or narrow strips. If the ground is too dry, lightly mist it before compacting for better results.
Getting this first step right will save you headaches later and keep your turf clean, solid, and long-lasting.
Step 2: Build a Pet-Safe Base Layer with Proper Drainage
Your turf is only as good as the base beneath it. To handle dog urine and rain, you need a solid drainage layer that won’t trap moisture or create odors. Start by adding 2–3 inches of crushed stone or decomposed granite (a compactable, drain-friendly gravel) across the cleared area. Avoid sand or loose soil—they hold water and can cause sinking.
Spread the material evenly and shape it with the same gentle slope you formed earlier. This helps liquid drain away instead of pooling under the turf. Once the material is in place, compact it firmly. Use a plate compactor for wide areas; a hand tamper works fine for smaller spots or narrow strips. If the base settles too low after compacting, add and tamp another thin layer to bring it back up.
Don’t skip this step. A poor base traps smells and weakens the turf over time. Done right, this layer keeps your lawn dry, stable, and safe for your dog.
Step 3: Roll Out and Cut the Artificial Grass
Now it’s time to roll out your turf and trim it to fit. Start by unrolling each piece and laying it flat across the compacted base. Make sure all rolls face the same direction—grass blades have a grain, and mismatched direction will look uneven.
Let the turf sit under the sun for at least 1–2 hours. This helps relax any wrinkles or curl from being rolled up. Don’t rush this part. A flat surface is much easier to cut cleanly.
Once relaxed, trim the edges using a sharp utility knife. Cut from the back of the turf, along the stitch rows, for better accuracy. Leave a bit of extra turf at the borders and where two pieces meet—you’ll trim it down precisely during the seaming step. Avoid cutting too close at this stage.
Laying and cutting turf isn’t about perfection on the first try. It’s about fitting pieces smoothly so the lawn looks natural once everything’s in place.
Step 4: Seam and Join Turf Sections Smoothly
Seaming artificial grass is all about making the turf look like one continuous surface. Start by laying adjacent pieces side by side with their blades pointing in the same direction. Align the edges carefully—there should be no gaps or overlaps. The fibers should meet naturally without forming a visible line.
Once aligned, fold back the edges of both sections and place seam tape or turf adhesive down the center. Slowly press each side back onto the tape, smoothing as you go. Apply steady pressure across the seam to bond both sides evenly. A carpet roller or heavy object can help strengthen the bond.
Don’t rush. Take your time to get the alignment perfect before you commit. If the blades are not aligned or the tape shifts, the seam will stand out. A well-done seam is nearly invisible—even close up.
Step 5: Secure the Grass and Prevent Dog Digging
Once your turf is in place, it’s time to secure it so it stays put—especially if you have a curious dog. Start by anchoring the edges using U-shaped turf nails or landscape staples. Place them along the perimeter every 6–8 inches, and drive them deep enough to hold the backing flush against the base.
Add extra nails at corners, seams, and any spot where the turf naturally wants to lift. If your dog likes to dig, place nails even closer together along the high-traffic edges or where their paws tend to scratch.
Make sure no part of the edge can be lifted easily by hand. If it moves, add more nails. The goal is to create a smooth, tight surface that feels permanent—and discourages dogs from trying to tug or flip it.
A secure edge is one of the best defenses against turf damage. Don’t skip this part.
Step 6: Add Infill or Leave as Non-Infill Pet Turf
Not all artificial grass requires infill—especially for pet areas. Some products are designed to work without it, while others perform better with a top layer of sand or deodorizing granules. Here’s how to handle both approaches.
If You Choose to Add Infill:
Use clean silica sand or pet-safe infill like zeolite to help with drainage, stability, and odor control. Spread the material evenly using a drop spreader, then brush it into the turf with a stiff broom. You’ll typically need 1–2 pounds per square foot. Avoid overfilling—just enough to keep blades upright and firm underfoot.
If You’re Using Non-Infill Turf:
Many pet-specific turf products, like non-infill grass with curled thatch layers, are designed to stay flat without any loose material on top. In this case, skip the infill and simply brush the fibers upright after installation. These options are cleaner, low-maintenance, and great for dogs who like to dig or chew.
Final Grooming: Brush Up and Rinse
Once the turf is in place, give it a final grooming. Use a stiff broom or turf rake to brush the blades upright, especially in areas that look flat or pressed down. This makes the lawn look fuller and more natural.
Next, hose down the surface lightly to remove dust and test the drainage. Watch how fast the water flows through—there should be no puddles. If it’s a pet area, take a moment to sniff for any odors. If everything looks clean, drains well, and smells fresh, you’re done.
Common Mistakes to Avoid When Installing Pet Turf
Avoiding small errors during installation can make a big difference in how your turf performs and lasts. Here are some of the most common mistakes DIY users make:
- Not removing deep-rooted grass or weeds before installation
- Skipping proper compaction of the base layer
- Sloping the base toward your home or dog kennel
- Using regular sand or rubber infill that traps odors
- Misaligning turf pieces or failing to hide seam lines
A bit of extra care upfront saves a lot of trouble later.
Ready to Install? Choose Turf Engineered for Pets
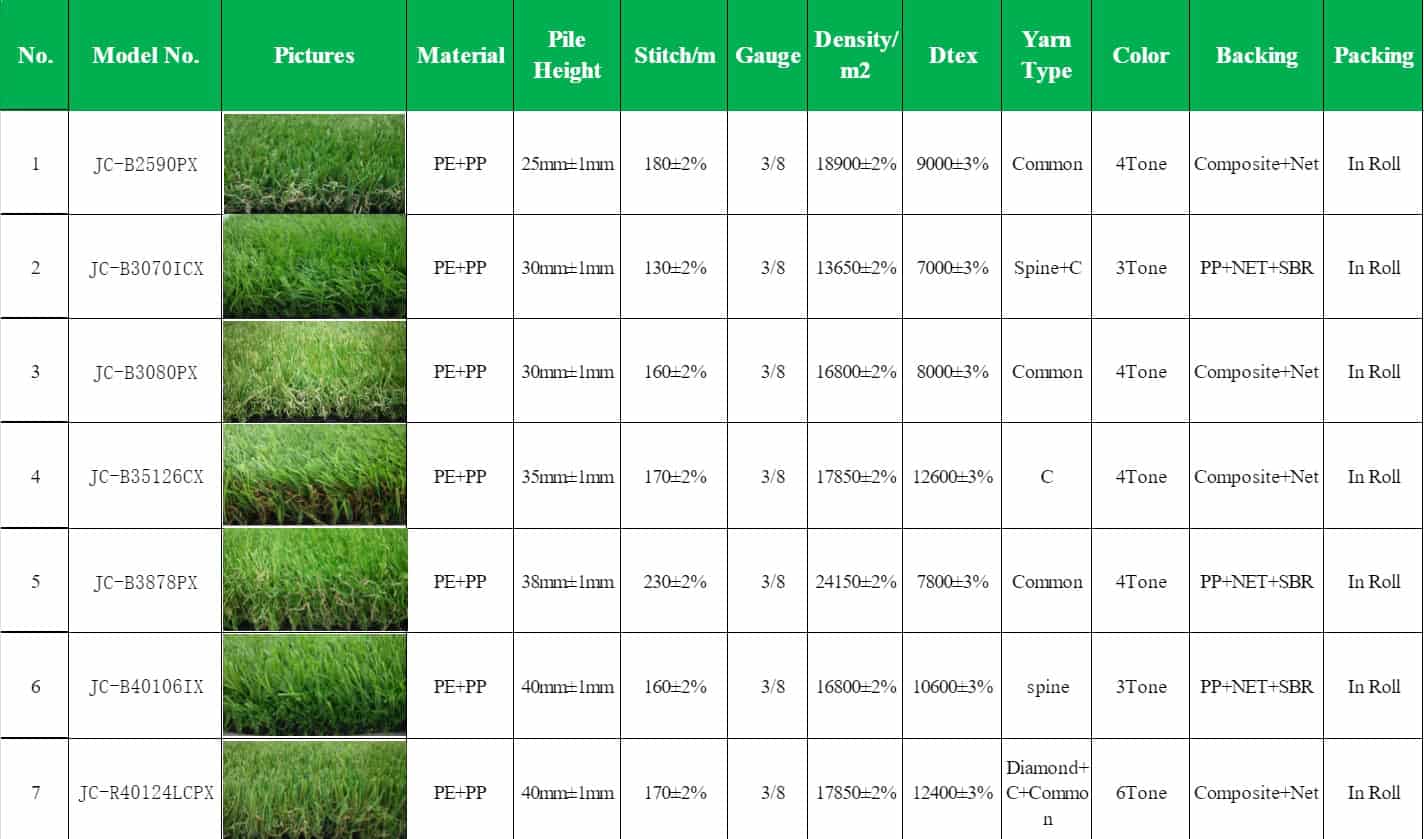
Now that you know what matters most in choosing turf for dogs, don’t settle for generic grass. At JCTURF, we offer a range of pet-friendly turf options, and our recommended pick—JC-PG30148KL—features a 30mm PE+PP pile, ultra-dense stitching for better wear and drainage, and non-infill backing for low-odor performance and fast cleanup. It’s specially designed to reduce urine smell without using messy sand or rubber.
Backed by over 15 years of in-house R&D and certifications like CE, ISO, and SGS, our turf solutions are trusted by pet owners and installers worldwide. Whether for your yard, patio, or indoor dog zone, we support tailored specifications to match your site and usage.
Explore our pet turf to find the right product for your dog-friendly space.