You’ve watched the tutorials, measured your yard (again), and told your partner it’s just some turf and a weekend. But here’s the kicker: not all artificial grass is made for putting. Some of it’s built for playgrounds, not precision. Lay the wrong type and your ball might bounce like it’s on a trampoline—or worse, stop halfway.
In this guide, we’ll walk you through how to actually build a putting green that rolls true, lasts long, and doesn’t embarrass you in front of your golf buddies. From base prep to turf that performs like a real green, this is everything you wish those YouTube videos had told you.
What Is a Putting Green?
A putting green is a smooth surface where golfers practice putting. Real greens are made of natural grass, carefully maintained for consistent speed. At home, putting greens are often made of artificial turf, replicating real green conditions for short game practice.
Why Build One Putting Green at Home?
If you really want to improve your game, or just want a fun and easy way to relax, a putting green at home is the way to go. It allows you to practice whenever you want, even for just a few minutes a day, without having to drive to a course or book a simulator, saving time and money.
- Having your own putting green has the following benefits:
- Build muscle memory through repetition
- Take advantage of small or unused spaces like basements, patios, or narrow yards
- Create an enjoyable and interactive experience for guests or family
- Test different putts or techniques in stable conditions, year-round, regardless of weather
- Design your own private putting green with easy installation and minimal maintenance, no mowing, watering, or fertilizing required
For many golfers, it’s not just about lowering your score, it’s about enjoying the game in a new, more personal way. With the right artificial turf, you can get professional-level performance at home without the maintenance that comes with a real course.
Planning Your DIY Putting Green
Before you start ordering turf or digging up your yard, it’s smart to pause and plan. A DIY putting green can be a great project—but only if it fits your goals, your space, and your budget. Here’s how to think it through.
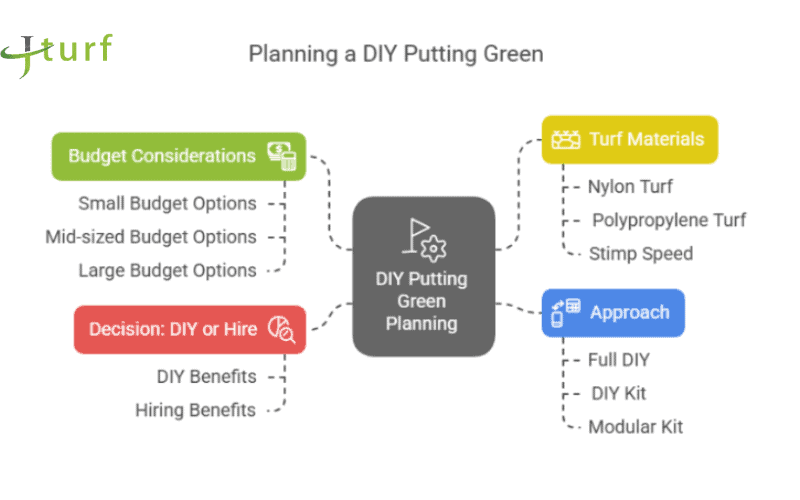
The first question is simple: Should you build it yourself or hire someone?
DIY can save you thousands of dollars, but it also takes time, tools, and a decent level of confidence. If you’re comfortable using basic construction tools and can spare a weekend or two, you’ll likely enjoy the process. But if your schedule is tight or your yard needs heavy grading, hiring a contractor might be the better call. Think about your trade-off: saving money vs. saving effort.
Next, take a close look at your budget. What can you realistically build with $500? What about $1,000 or more?
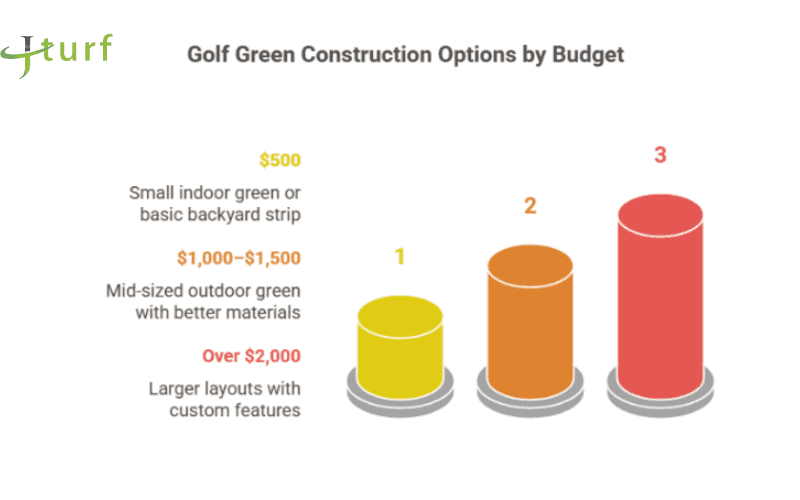
In general, $500 can get you a small indoor green or a basic backyard strip—something around 6×10 feet, with basic turf and no frills. A $1,000–$1,500 budget opens the door to a mid-sized outdoor green with better materials and more hole options. Over $2,000, you can explore larger layouts, contour shaping, or add custom features like fringe turf or border edging. Knowing your budget early helps narrow your choices fast.
Now, let’s talk materials—specifically the turf. Here are the key differences you should know:
- Nylon turf is highly durable and delivers a faster ball roll. It’s often chosen by golfers who want a serious, long-term practice surface.
- Polypropylene turf is softer and more budget-friendly, but it wears down faster and isn’t ideal for outdoor use over time.
- For a realistic putting experience, choose turf with a Stimp speed rating between 9 and 11.
- Sand infill can help you fine-tune speed and ball response, but it also requires occasional brushing and upkeep.
- If you’re installing outdoors, make sure your turf has UV protection and proper drainage backing to handle weather exposure.
Finally, consider your approach. Will you build everything from scratch, or would a DIY putting green kit make more sense?
Kits are great if you want a plug-and-play experience with less room for error. They usually include pre-cut turf, cups, and a base system. Some even let you choose shape and hole locations.
But full DIY gives you total control and may be cheaper if you already own tools. If you’re somewhere in between—confident but not ready to design from zero—a modular kit can be a smart middle ground.
Each decision you make here will shape the result. Take the time to get it right before you move into the build. Planning well doesn’t just save money—it saves frustration.
How to Build a DIY Putting Green?
If you’re ready to get started, the first step is making sure you have everything you need. This isn’t a complex build, but a few key materials and tools will make the process much easier—and the results far better.
Start with your base materials. You’ll need:
- Crushed stone or gravel (3/8″ or similar) to build a stable, well-draining base. This layer supports everything above it.
- Leveling sand or granite screenings to smooth the surface and create subtle contours.
- A weed barrier fabric, placed under the base layers to prevent unwanted growth over time.
Then, for the installation itself:
- A plate compactor (rentable at most hardware stores) will help you compress the base and sand layers properly.
- Turf cutter or utility knife is essential for shaping the turf around edges and holes.
- Landscape staples or turf glue will hold the turf in place. Choose galvanized staples if you’re working outdoors—they hold better in wind and rain.
- A roller or tamping tool to press down seams and ensure the turf lays flat.
If you’re building a green indoors, you can skip the gravel and compactor. Instead, work with a flat plywood or MDF base and use foam padding underneath for feel and shock absorption.
Once you have your materials, you can begin the installation.
How to Build Putting Green with Artificial Turf?
1. Prepare the area
Mark out your desired shape. Remove any grass, rocks, or debris. Dig out the top 4 to 6 inches of soil, especially for outdoor builds—this makes room for your base layers.
2. Build the base
Start by laying your weed barrier. Then add 3–4 inches of crushed stone and compact it thoroughly. Add 1–2 inches of leveling sand or screenings on top. Use a rake or screed board to smooth the surface and create your desired slope or contours. Compact again.
3. Install the turf
Roll out the turf and let it sit in the sun for 1–2 hours to relax any folds. Trim it to shape using a turf cutter or sharp utility knife. Make small relief cuts at corners to avoid bunching.
4. Secure and finish the surface
Use landscape staples or glue to hold the turf in place, especially along edges and seams. Press seams flat with a roller and brush against the grain to lift fibers. If using sand infill, spread evenly and brush it in to help stabilize the turf and improve ball roll.
5. Cut and set your holes
Mark your hole locations, then cut clean circles using a hole saw or a sharp blade with a template. Insert plastic or metal cups, then brush the turf again for a clean finish.
Once that’s done, your green is playable. You might still tweak a few things—like adding fringe turf or placing a border—but the core work is complete.
Artificial Putting Green Mistakes
Before you dive in, here are a few things others learned the hard way:
- Compacting matters more than you think. Skipping this step leads to bumps, sinking spots, and a green that never rolls true.
- Check your level from all directions. Some users use a basketball to test how the surface breaks and catches slopes—it’s a great trick before laying turf.
- Glue is messier than it sounds. If you’re not experienced, staples give you more control—especially on curves or tight seams.
- Don’t over-tighten seams. Leaving a tiny gap allows turf fibers to expand and avoids visible lines later on.
- If you’re building indoors, allow for a stable standing platform. A ¾” plywood platform underfoot helps you putt naturally, without the ball being above your feet.
Small details like these can make the difference between a green that “works” and one that feels like a real practice surface.
How to Build a Putting Green with Real Grass?
To build a putting green with real grass, follow these key steps:
- Choose Location: Select a flat, well-drained area with plenty of sunlight.
- Clear the Area: Remove existing grass, weeds, and debris.
- Add Drainage: Spread a 2-4 inch layer of gravel or crushed stone for proper drainage, ensuring a slight slope.
- Level the Surface: Add a thin layer of sand and smooth it out. Roll the surface for evenness.
- Topsoil Layer: Spread 1-2 inches of topsoil to create a base for the grass.
- Seed or Sod: Plant bentgrass or Bermuda grass. Optionally, use sod for quicker results.
- Watering and Care: Keep the area moist during initial growth. Gradually reduce watering as the grass establishes.
- Fertilize: Apply slow-release fertilizer for healthy growth.
- Install Edging: Use brick, wood, or stone to define the green’s perimeter.
- Regular Maintenance: Mow the grass to 1/4 to 1/2 inch, aerate annually, and manage pests and disease.
With these steps, you’ll have a functional and professional-looking putting green. But real grass is easily affected by environmental factors, resulting in uneven turf and affecting the user experience; artificial grass can maintain uniform putting speed and surface stability, and does not require regular watering, mowing or fertilizing.
DIY vs Professional Putting Green
When it comes to installing a putting green, there are two main options: DIY (Do It Yourself) or hiring a professional. Here’s a simple comparison:
DIY Putting Green: Installing a putting green yourself can be a budget-friendly option. You save money by avoiding labor costs, but it requires time, effort, and some skill. You’ll need to plan, prepare the area, and lay the turf, which can be challenging for those without experience.
Professional Putting Green: Hiring professionals ensures a high-quality, smooth surface that mimics a real golf green. The installation is quicker and more efficient, with experts handling every detail, from turf to drainage. This results in a more polished look, although it comes at a higher price.
Design and Building a DIY Putting Green: Indoor, Backyard, or Outdoor Lawn
The space you choose for your putting green will shape how you design and build it. Not every location has the same challenges, and each one requires slightly different planning. Let’s break it down.
Indoor Putting Green
If you’re building indoors putting green, like in a basement, spare room, or garage, you won’t need gravel or drainage. But you do need a firm, even surface to practice properly. Most DIYers lay turf over a plywood or MDF platform to ensure a stable, level stance. This is especially useful if you’re placing it on soft carpet.
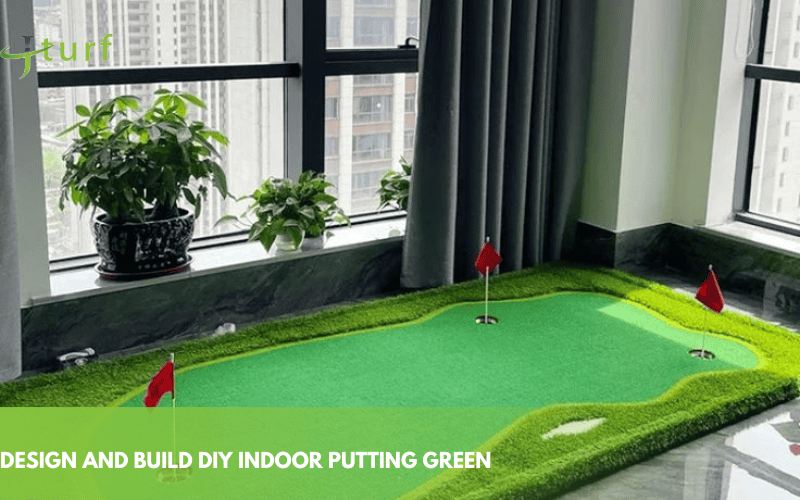
Here’s how different surfaces work best:
- Carpet: Add a plywood base under your feet so the ball doesn’t roll uphill.
- Tile or hardwood: Use double-sided tape or hook-and-loop fasteners instead of glue—so the turf stays put but can be removed later.
- Concrete: Works well with foam padding underneath to reduce sound and soften the feel.
To get realistic ball movement indoors, consider placing foam underlayment beneath the turf. It mimics the slight give of a natural green and helps with acoustics in echo-prone rooms.
Keep the layout simple—a straight roll with one or two holes is often enough. If you want variety, you can simulate slopes using yoga mats or foam wedges underneath.
DIY Backyard Putting Green
Outdoor spaces give you more room and freedom to explore different backyard putting green ideas, but they also come with more ground prep. The surface won’t be ready to build on as-is, so leveling and drainage matter most here.
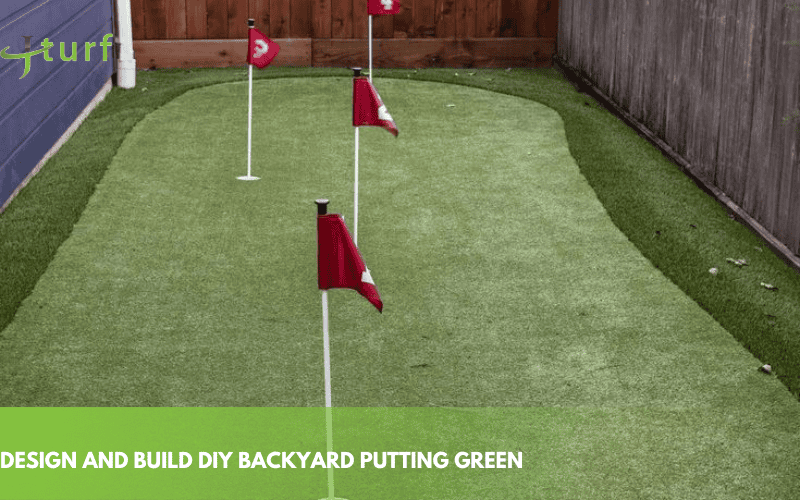
Here’s what you should focus on outdoors:
- Base preparation: Dig out 4–6 inches of soil and install a crushed stone base for drainage. Compact it well. Add a top layer of leveling sand to create your final contours.
- Sun exposure: Choose UV-resistant turf if your yard gets full sun. Constant exposure can wear down low-quality materials.
- Trees and shade: Watch for debris and roots under the surface. You may need to clear root systems or remove mulch-prone trees nearby.
- Foot traffic: If your green will be used often or by multiple people, pick turf with dense fibers and a thick backing. This resists matting and wear near holes.
Design-wise, a backyard green lets you add short breaks, multiple cups, or fringe turf. Just remember to leave space around the edge for maintenance access and drainage.
Basement Putting Green Ideas
When building a basement putting green, consider the following:
Space Selection: Ensure the basement has enough space and ceiling height to comfortably use the putting green.
Level Floor: Clean and level the basement floor, and if needed, add a sand or base layer to ensure a smooth surface.
Drainage System: Basements can be damp, so ensure proper drainage to prevent water buildup that could affect the turf and air quality.
Appropriate Grass: Use indoor-friendly artificial turf rather than natural grass, which requires sunlight.
Ventilation and Lighting: Install proper ventilation and lighting to keep the air fresh and ensure visibility during use.
Quality Materials: Choose durable, low-maintenance artificial turf and materials to ensure long-term usability.
Outdoor Lawn or Open-Space Greens
Large open areas may seem ideal, but nature can create unexpected problems if you’re not prepared. You’ll need to anchor and protect your green from wind, water, and long-term exposure.
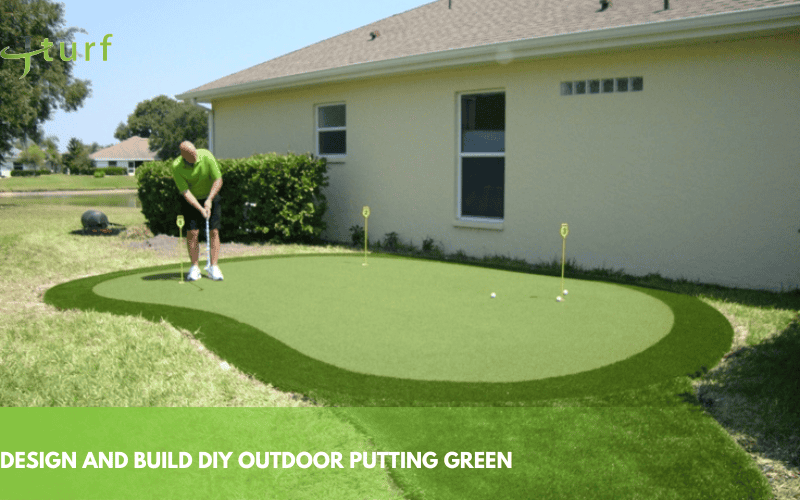
Key environmental risks to account for:
- Wind: Use longer galvanized staples and/or border frames to keep turf secure. In open fields, turf edges tend to lift more easily.
- Water: Avoid placing the green in low areas. Slight crowning or slope will help shed water and reduce pooling.
- Weather: Choose turf with solid drainage backing and high UV protection. Add edging (like treated lumber) to hold your base materials in place during storms.
If you’re working with a sloped or uneven site, plan for a small retaining wall or extra base material to even out the grade. Over time, this makes the green more stable and easier to maintain.
Each location has its pros and cons, but no space is off-limits if you design smart. Adapting your green to your environment—not the other way around—is the best way to build something that lasts and performs well.
DIY Putting Green Cost
The cost of a DIY putting green can vary based on size, materials, and complexity, but typically ranges from $1,000 to $5,000. Key factors influencing cost include:
- Artificial Turf: $2 to $5 per square foot.
- Base Materials: Gravel, sand, and topsoil may cost around $500 to $1,000.
- Tools and Accessories: Additional costs for tools, edging, and drainage systems can add $200 to $500.
For smaller, simpler setups, the cost will be on the lower end, while larger, more elaborate greens with custom features will be more expensive.
Refining Your DIY Putting Green: Design, Playability, and Upkeep
You’ve got the space. You’ve mapped out your layout. Now it’s time to refine the details—improving how your green performs, feels, and holds up over time. The suggestions below are drawn from real installations and years of product experience. Whether you’re going for a backyard game zone or a serious practice surface, these upgrades can make a real difference.
How to Reinforce or Improve Your Base After Installation
Even if your putting green is already installed, the base might need adjustments over time. You might notice soft spots, slight dips, or areas that don’t drain well. These don’t mean your project failed—just that it’s time for fine-tuning.
Here’s how to strengthen or improve an existing base without starting over:
- For soft or bumpy areas: Carefully lift the turf and add more leveling sand or granite screenings underneath. Compact it before re-laying the turf.
- For drainage issues: Check the grade. If water collects, you may need to create a slight slope by removing a bit of base material at the high edge or adding more at the low point.
- For seam dips or edge sinking: These usually happen due to poor compaction. Reinforce the edges with additional stone or foam board backing, then staple or glue more securely.
Think of the base as a living part of your green—not something fixed forever. Even pros revisit the surface after a season to make adjustments for better roll and long-term stability.
How to Add Realistic Breaks and Adjust Speed After the Green Is Built
Your green might be flat and functional, but lacks that real-course feel. If you’re looking to improve realism—without tearing things up—there are a few easy ways to upgrade both speed and contours.
Here are some ways to do it:
- Create subtle breaks by placing EVA foam pads or rubber wedges beneath specific areas of the turf. These can be added under the existing base if it’s modular, or under a new overlay.
- Change turf direction to adjust roll speed—brushing fibers “against the grain” will slow the ball; brushing “with the grain” speeds it up.
- Add infill gradually (fine silica sand) to increase firmness and speed. Start with a light layer and test your ball roll before adding more.
- Simulate uphill or downhill putts by adjusting your stance platform elevation relative to the putting surface. This is especially helpful for indoor setups.
These tweaks don’t require a full rebuild—and they’re often what separates a casual home green from a truly functional practice tool.
Thinking About Flexibility? Modular Design Can Help
If you’re renting your home, or just want the option to move things later, modular construction can be a smart choice. Instead of building in-place, you can create your green on raised platforms or interlocking panels.
This works especially well indoors or on patios. Use carpet tape or Velcro to secure turf in sections. Build the surface on plywood frames and join them together with metal brackets. You can also cut the turf into panels with seam tape underneath to create invisible joints.
This way, if you move—or just want to take the green down for a while—it comes apart without damaging your surface or flooring.
If you’re looking for a smarter alternative, our artificial grass tiles snap together cleanly, lift without damage, and give you a professional-grade modular green—no tools or glue needed.
Worried About Long-Term Wear? Here’s What to Expect
Even low-maintenance turf needs occasional care to stay at its best. You won’t need mowing or watering, but some regular upkeep will help your green last for years.
Key maintenance points:
- Brush the surface regularly to lift fibers and keep ball roll consistent
- Check seams and edges every few months and re-secure any lifted areas
- Clean off leaves, dust, or pet debris with a blower or stiff brush
- Expect to replace high-wear areas like cup edges every 5–7 years depending on use
- Avoid standing water—drainage is your best defense against mold or turf damage
A well-built and well-maintained DIY green can easily last 8–10 years outdoors, and even longer indoors. The better your build, the longer the play.
Done right, a DIY putting green isn’t just a fun project—it’s a long-term asset to your home, your game, and your lifestyle. And a little extra design thinking now will pay off every time you step up to the ball.
Can I Use Artificial Turf Indoors Without Damaging My Floors?
Yes, just avoid permanent adhesives. Use interlocking tiles, double-sided tape, or Velcro to keep your floor intact and your turf in place.
How Do I Keep the Turf From Slipping Or Bunching Over Time?
Use proper edge framing or heavy backing tiles to anchor it. For added grip, a layer of non-slip matting or turf tape between layers works well.
Is It Possible To Expand My Green Later Without Starting Over?
Absolutely. If your base is modular or panel-based, you can add sections by aligning seams and extending the sub-base. Plan for future growth when cutting turf.
What If I Don’t Have Tools to Build a Green?
Yes. Many modular systems—including our artificial grass tiles—require no tools or glue. You can snap them together and build a smooth surface by hand.
Find the Right Turf Manufacturer for Your Putting Green?
Building a putting green at home is fun, but a good putting green starts with the right turf. It helps the ball roll better, feels nicer to walk on, and stays strong over time.
At Jcturf, we make turf that works well for all kinds of putting greens. You can use it in your backyard or even inside your home. We have different options to match your space and needs.
Check out our diy putting green kit to get started. Or need help to do custom? Just contact us, we’re here to help.

