Building a DIY golf hitting mat yourself helps save money and customize your practice area. Not only does it offer significant cost benefits compared to buying a pre-made mat, but it also allows you to tailor the mat to fit your needs, whether for indoor or outdoor use.
In this guide, we’ll cover everything you need to know: from the materials required and a step-by-step build process, to common mistakes to avoid. We’ll also discuss how to maintain and repair your mat for long-term use and answer frequently asked questions. Plus, we’ve included extra tips to enhance your DIY mat for even better performance.
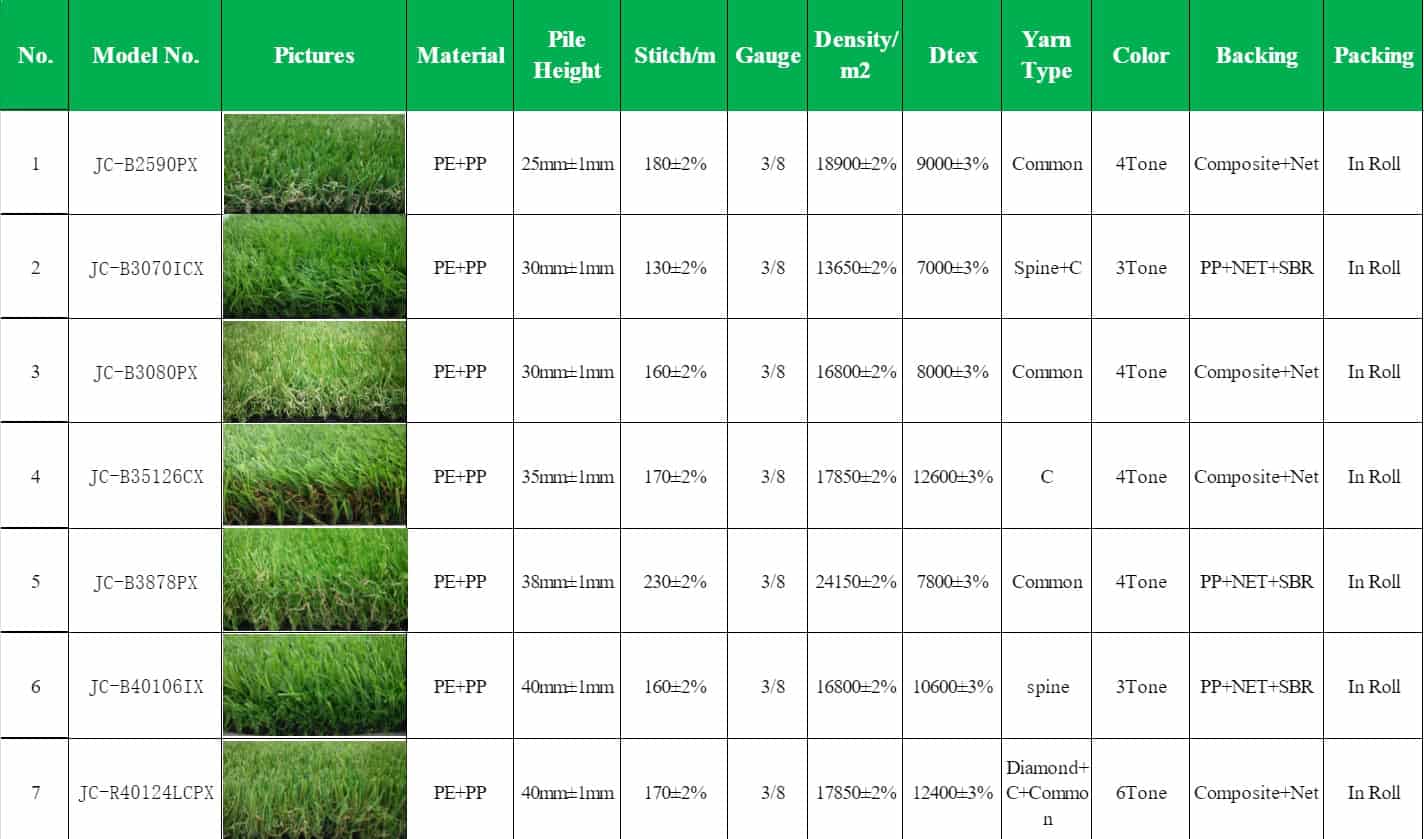
Materials You’ll Need to Build a DIY Golf Hitting Mat
Building your own golf hitting mat starts with the right materials. Each component is key to creating a durable and functional mat for comfortable practice. Here’s what you’ll need.
Foam Interlocking Floor Panels
Foam interlocking floor panels are an excellent base material for your mat. They provide cushioning and durability while absorbing shock, making practice more comfortable. Just grab a utility knife and cut the panels to the right size. That way, they’ll fit snugly and form a really solid base.
Turf Flooring Material
For a realistic experience, choose short-pile synthetic grass or fairway turf. Short-pile turf mimics real grass, while fairway turf is more durable for outdoor use. Ensure the turf you select suits your practice needs, whether you’re using a simulator or just practicing in your backyard.
Hitting Strip
A hitting strip gives important feedback and protects your joints. Foam, gel, or divot action strips are ideal choices. Foam strips are softer, while gel strips offer more realistic feedback. Divot action strips simulate the feeling of hitting into real turf, improving your swing mechanics.
Double-Sided Rug Tape
Double-sided rug tape holds the turf securely to the foam base, preventing shifting during use. Apply the tape around the edges and press it down firmly for a stable, lasting mat.
Optional Add-ons
- Rubber tee holder: For practicing tee shots.
- Extra turf: To create a putting strip for added versatility.
- Utility knife: For precise cutting.
Step-by-Step Guide to Building Your DIY Golf Hitting Mat
Now that you have your materials ready, let’s walk through the steps to build your very own golf hitting mat. This guide will ensure you create a durable and functional mat that suits your practice needs.
Step 1: Prepare the Base
Choose your base material (plywood or rubber mats). Cut it to your desired size. A common recommendation is 5′ x 5′ for a comfortable practice area, but you can customize it to fit your space. Ensure the base is clean, level, and free of debris.
Step 2: Add Padding
Lay foam mats on top of the base to create a soft, joint-friendly layer.
Arrange the foam mats tightly together to avoid gaps. Trim any excess foam using a utility knife to match the size of the base.
Step 3: Install the Hitting Strip
A high-quality hitting strip is essential for providing accurate feedback and protecting your joints. Whether you choose a foam, gel, or divot action hitting strip, make sure it is positioned correctly. Place it firmly in place, ensuring it aligns with the hitting area. This will stop your clubs from getting damaged and give you a more realistic practice.
Step 4: Attach the Turf
Spread construction adhesive or carpet tape evenly over the foam padding (or directly on the base if you’re skipping the foam). Carefully lay the artificial turf on top, starting from one edge and working your way across to avoid wrinkles or bubbles. Press down firmly to ensure good contact between the turf and the adhesive.
Step 5: Trim the Excess Turf
Use a utility knife to trim any overhanging turf for a clean, polished look. Be precise to ensure the turf edges align perfectly with the base.
Step 6: Install Optional Features
- Rubber Tee Holder: Cut a small hole in the turf and foam to insert a rubber tee holder.
- Putting Strip: If desired, add a separate strip of turf on one side for putting practice.
- Visual Guides: Use paint, tape, or markers to create alignment guides for your swing.
Step 7: Let It Cure
Allow the adhesive to dry completely. Follow the adhesive manufacturer’s instructions for curing time (typically 24–48 hours). Avoid using the mat until it’s fully cured to ensure durability.
Tips for Success
- Go Bigger if Possible: Larger mats provide more room to move around and improve your practice experience.
- Choose the Right Turf: Look for turf explicitly designed for golf practice , like JCturf Golf Turf, to ensure realistic feedback and durability.
- Ensure a Level Surface: A stable platform is essential for accurate swings and to prevent injuries.
- Consider Joint Protection: Use foam padding to reduce the impact on your joints, especially if you practice frequently.

Common Mistakes to Avoid When Building a DIY Golf Hitting Mat
While building your own golf hitting mat is a great way to save money and customize your setup, there are several common mistakes to watch out for. These errors can affect the comfort, durability, and performance of your mat, so it’s important to get them right.
- Incorrect Size or Dimensions
- A significant error that individuals frequently make is failing to measure their designated area with precision. If the mat is too small, it won’t offer enough room for practice; too large, and it may not fit your available area. Make sure to measure carefully, taking into account your golf simulator setup or the space you have available for a backyard or office mat. This will ensure the mat is the right size for your needs.
- Choosing the Wrong Materials
- Don’t be fooled – not all materials are on a level playing field. Opting for low-quality turf or foam is a recipe for disaster; it’ll seriously throw a wrench in your practice. Poor turf won’t mimic the feel of real grass, and cheap foam may not provide enough cushion or durability. Invest in good-quality turf (such as short-pile synthetic grass) and thick foam that can stand up to repeated use. This will make your practice feel more real and comfortable.
- Improper Stability and Durability
- If your mat isn’t properly assembled, it will lead to instability. Loose layers can shift during use, causing discomfort and possibly damaging your clubs. Secure everything with double-sided rug tape or strong adhesive to make sure each layer stays in place. Properly assembled mats provide a stable, smooth surface for consistent practice.
- Not Considering the Base
- The base of your mat is critical to its durability. If you choose the wrong base material, it can cause the mat to wear down quickly. Make sure to select a strong base, such as thick foam or rubber, that can handle impact over time. A solid base will help prevent shifting or compression, ensuring a longer-lasting mat.
What to Put Under Your DIY Golf Hitting Mat?
The foundation beneath your DIY golf hitting mat is crucial for stability, durability, and performance. Here’s what you should consider placing under your mat to ensure it stays secure and lasts longer.
Best Base for a Golf Mat
A solid base is essential to protect the turf and ensure the mat stays stable during use. Common options include foam, rubber, and plywood.
- Foam: Provides cushioning and shock absorption for comfortable practice.
- Rubber: Offers excellent traction and durability, preventing movement, especially in high-traffic areas.
- Plywood: A sturdy, rigid option that provides a stable foundation, though with less cushioning.
Choose the best base depending on whether you prioritize comfort, durability, or stability.
What to Put Under Your Mat to Prevent Slipping
To prevent slipping, add a layer under your mat. Without it, the mat could shift during practice, which can be frustrating and unsafe.
- Rubber Underlay: Offers grip and keeps the mat in place.
- Non-Slip Rug Pad: A simple solution to prevent movement on hard surfaces.
- Heavy Duty Tape: Use around the edges of smaller mats to keep them secure.
These options ensure your mat stays stable, providing a safer and more consistent practice surface.
How to Maintain and Repair Your DIY Golf Hitting Mat
Proper maintenance and repairs will keep your DIY golf hitting mat in great shape, ensuring it lasts longer and provides consistent performance.
Cleaning and Care
Regularly brush the turf with a soft – bristled brush to remove debris. For deeper cleaning, wash it with mild soap and water, then let it dry fully. Clean the foam base with a damp cloth to prevent dirt buildup, but avoid soaking it in water.
Repairing Worn Areas
Over time, the hitting strip or turf might show signs of wear. If the hitting strip becomes damaged, you can easily replace it. Just take off the old strip, trim a new one to the right size, and fasten it in position. Foam and gel strips are simple to swap out, and replacing them regularly will maintain a smooth, comfortable hitting experience.
For worn turf, inspect for any fraying or thinning areas. You can patch these spots with a new piece of turf or use turf adhesive to secure a small patch. This repair helps keep your mat looking fresh and functional.
Upgrading Your Mat
Consider upgrading the hitting strip to a higher-quality foam or gel for better feedback. Adding features like a ball return system can also enhance your practice sessions by saving time and improving efficiency.
Consider cutting out a section of the turf and foam to insert a replaceable hitting strip. This allows you to replace only the worn-out section instead of the entire mat.

DIY Golf Hitting Mat or Buying One?
There’s no denying that building your own golf hitting mat gives you a clear upper hand over simply buying a ready-made one. Not only can it save you money, but it also provides the flexibility to customize the mat to fit your space and needs.
Why DIY Golf Hitting Mat?
Cost Benefits: Buying a commercial golf hitting mat can be expensive, often costing between $200 and $1000. By building it yourself, you can get similar performance for much less money. Using basic materials like foam tiles and synthetic turf, you can create a mat that works for just a few hundred dollars. Plus, with a DIY mat, you can replace worn sections, such as the hitting strip, instead of buying a whole new mat, which saves money in the long term.
Customization and Flexibility: A DIY mat allows you to tailor the size, feel, and material to your needs. Whether you’re building a mat for your backyard or office, you have complete control over the design. You can choose the right turf to match your golf simulator or create a more durable mat for outdoor use.
Personal Satisfaction: There’s something rewarding about building your own mat. It’s not just functional; it’s personal. You can customize it exactly to your preferences, knowing you’ve created something that fits your space and practice needs perfectly.
Why Buy Golf Hitting Mat?
Convenience: Buying a pre-made mat saves time and effort. You don’t need to source materials, measure dimensions, or assemble anything—it’s ready to use right out of the box.
Professional Quality: Many commercial mats are made from high-quality materials that are designed to withstand heavy use. They often provide a more realistic feel, mimicking the experience of hitting off real grass. High-end mats are engineered to protect your clubs and joints, offering features like shock absorption and divot action hitting strips.
Longevity: While the upfront cost of a commercial mat is higher, it may last longer than a DIY mat, especially if it’s made with durable materials and advanced construction.
Warranty and Support: Most commercial mats come with warranties and customer support, giving you peace of mind in case of defects or issues.
DIY Golf Hitting Mats Frequently Asked Questions
How Long Will My DIY Golf Hitting Mat Last?
Your DIY mat’s lifespan hinges on material quality and usage frequency. High – quality turf and foam, along with proper care, can make it last for years. Regular maintenance, cleaning, and checking for wear will help extend its life. Avoid prolonged exposure to extreme weather and replace worn areas as needed.
Can I Use Carpet as a Golf Mat?
While carpet can be a temporary substitute, it’s not ideal for long-term use. Carpet lacks the durability and feedback of real turf, which could affect your practice experience. Though inexpensive, it may also wear down your clubs. For better results, it’s recommended to use proper turf or dedicated hitting mat materials.
Do Golf Mats Damage Clubs?
Golf mats can potentially damage clubs, especially if the surface is too hard or the mat material isn’t suitable. Using high-quality turf and hitting strips, such as foam or gel, helps reduce the risk of club damage while offering better comfort and feedback.
Additional Tips and Tricks for Building a Better DIY Golf Hitting Mat
If you want to enhance the performance and realism of your DIY golf hitting mat, or adapt it for outdoor use, these additional tips will help take your mat to the next level.
Improving Realism and Performance
To make your DIY mat feel more like real grass, consider adding extra cushioning or using higher-quality turf. Thicker foam or gel hitting strips can provide better shock absorption, reducing joint strain while improving the overall feel. Opt for short-pile synthetic grass or fairway turf for a more authentic, realistic experience that mimics the feel of a golf course.
Building for Outdoor Use
For outdoor setups, weather – resistant materials are crucial. Durable synthetic turf can endure sun, rain, and wind without fading or degrading. Additionally, consider a waterproof base to ensure stability in wet conditions. If you’re leaving the mat outside, try to store it away when not in use to extend its lifespan.
Enhancing Feedback Accuracy
Using divot action hitting strips can significantly improve feedback accuracy. These strips mimic the feeling of hitting into real grass, thereby improving the practice experience. The divot action mimics how the club interacts with the ground, which helps refine your swing and provides more realistic feedback.
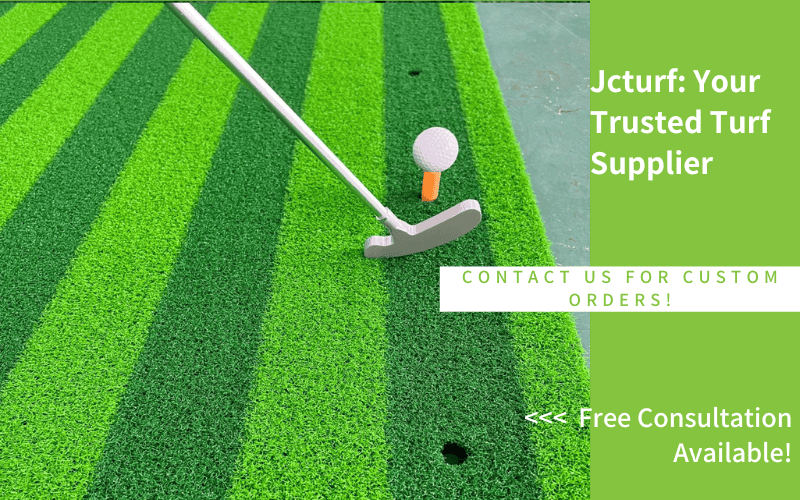
Why Choose JCturf as Your Supplier for DIY Golf Hitting Mats
As a leading manufacturer and supplier of artificial grass, we offer a variety of turf options that can take your DIY mat to the next level. Whether you’re looking for turf that mimics real grass or a more durable option for outdoor use, we have you covered. With our products, you’ll enjoy a stable and comfortable practice area, whether you’re practicing your putting or full swings.
Our turf comes in various heights and density to ensure the mat sits securely on the green, providing a stable and comfortable practice surface. High-elasticity fibers absorb the pressure from hitting mats while preventing sliding, ensuring stability and comfort during use.
Visit our website to explore our range of artificial golf grass and other materials designed for DIY golf mats. Our expert team is perpetually available to aid you in selecting the optimal products for your setup. Build the perfect golf hitting mat today with JCturf!