Dreaming of your own DIY backyard putting green? You don’t need a contractor—just the right tools, a clear plan, and a bit of hands-on effort. In this guide, we’ll walk you through everything step by step: from choosing the best spot and sketching the layout, to digging, compacting, and laying turf like a pro. You’ll learn how to install cups, trim the surface, lock everything in place, and even fine-tune the roll before your first putt. We’ll also show you how to maintain your green long-term so it stays clean, smooth, and playable season after season. Let’s get started—your home putting green is closer than you think.
Step 1: Tools and Materials You’ll Need for DIY Putting Green
Before you start installing your backyard putting green, you’ll need to gather the right tools and materials. Here’s everything you should have ready from the start:
| Item | Purpose |
| Measuring tape | For accurate layout and cup placement |
| Garden hose or spray paint | To outline the shape of your putting green |
| Weed killer (optional) | To prevent grass regrowth under the turf |
| Shovel and rake | For excavation and spreading gravel |
| Work gloves | To protect your hands during digging and cutting |
| Landscape fabric | A weed barrier below the gravel base |
| 3/8 minus gravel (with fines) | Forms a compactable and drainable base |
| Plate compactor or hand tamper | To compress the gravel evenly |
| Level | To check base flatness and cup depth |
| Putting cups | 4.25″ diameter cups for regulation-size holes |
| Synthetic putting turf (short pile) | The top layer of your green |
| Utility knife (new blade) | For trimming turf and cutting cup holes |
| Turf staples or landscape spikes | To secure the turf in place |
| Optional edging material | For visual finish and ball containment |
*Depending on your yard and design choices, some items may vary—but this list covers the essentials for most standard DIY backyard putting green installations.
Step 2: Choose the Right Location for Your Putting Green
Where you place your backyard putting green will affect everything—from drainage and ball roll to how long your green lasts. A poor location can lead to soggy turf, uneven play, and future maintenance problems.
Choose an area that is as flat as possible. Slight slopes are acceptable, but avoid steep grades or low spots where water collects. Good drainage is critical, especially after rain. If water tends to pool in a certain part of your yard, don’t build there.
Also think about space. Make sure the area is wide enough for your desired green shape and turf dimensions. If you’re using pre-cut turf rolls, factor in their width when measuring. Avoid shaded corners, under large trees, or near heavy foot traffic paths. A sunny, open, and accessible spot is often the best choice.
Step 3: Plan the Shape and Size Based on Turf Dimensions
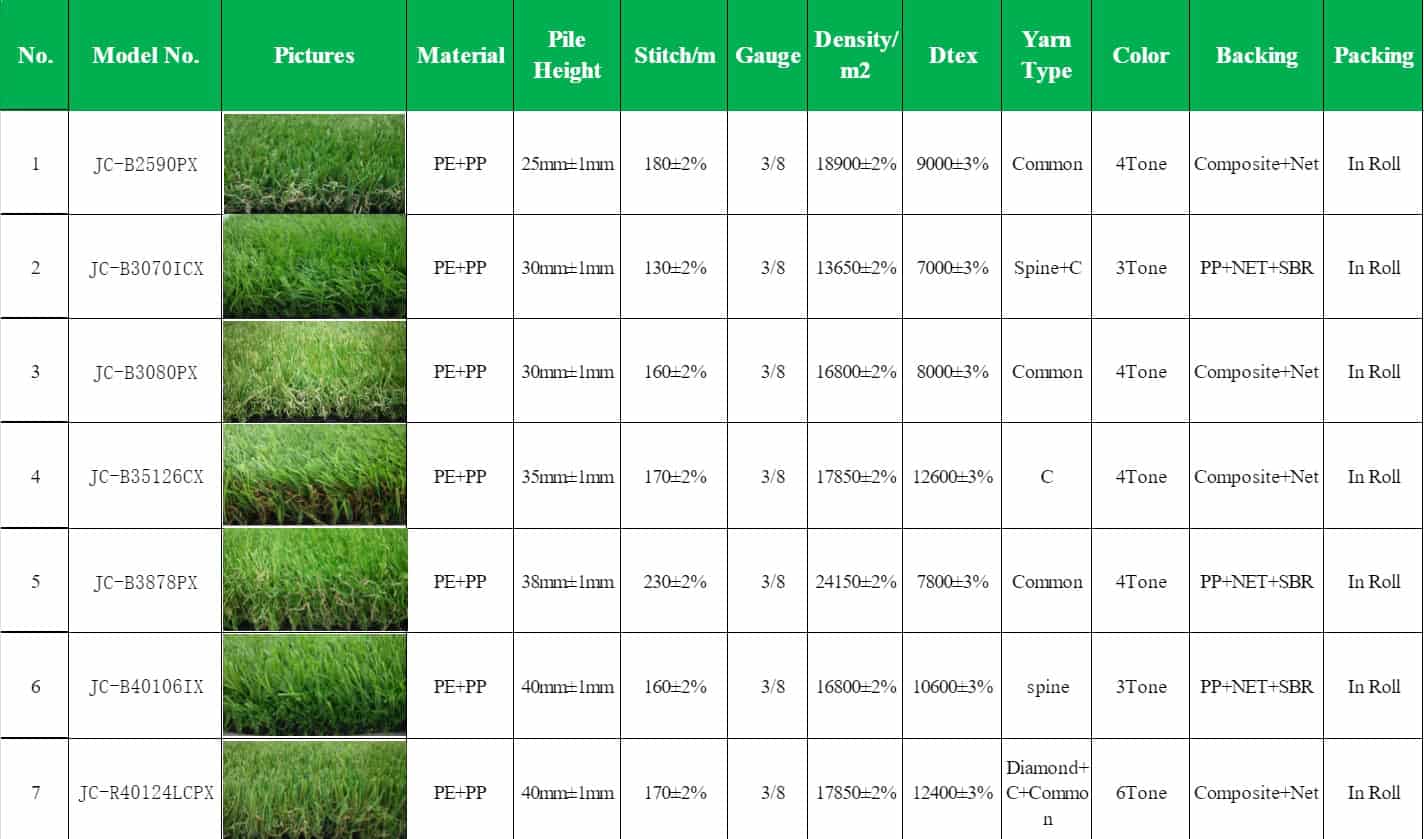
Before you decide on the shape of your putting green, keep one thing in mind: synthetic turf comes in fixed roll widths—commonly 7.5, 12, or 15 feet. That means your green design should match those dimensions as closely as possible to reduce waste and make installation easier.
Start by sketching a rough layout that fits your space. Make sure the width of the area works with the turf size you’ll be using. Longer greens allow for more putting variation, while wider shapes give you flexibility with hole placement. If you’re adding more than one cup, space them out for realistic practice. Avoid awkward edges or tight corners where turf will need heavy trimming. Think practical over fancy—simple shapes install faster and usually play better.
Step 4: Clear the Grass and Remove the Topsoil

Before you can build a proper base, you’ll need to clear out all the grass and remove the topsoil in your layout area. Don’t just trim the lawn—dig down to expose bare dirt. This creates room for the gravel foundation and prevents the turf from sinking over time.
Use a string trimmer or sod cutter to remove the grass. Then dig out about 4 to 5 inches of soil across the entire marked area. A shovel works fine for small spaces, but a powered sod cutter will save time on larger jobs. Once the soil is removed, rake the surface flat and clear out any roots, rocks, or loose debris. The cleaner and more even the surface, the better your final putting green will perform.
Step 5: Install a Weed Barrier Layer
Don’t skip the weed barrier. Even if you’ve cleared the grass, roots and dormant seeds can still push through over time. Installing a landscape fabric underneath your putting green helps block weed growth and keeps your surface clean, smooth, and low-maintenance.
Roll out the fabric directly over the bare soil before adding gravel. Overlap the edges by a few inches to avoid gaps, and make sure the entire area—including corners—is fully covered. Cut the fabric to fit your layout, and use garden staples or small spikes to hold it in place. Avoid tearing or stretching it, as weak spots can allow regrowth. This simple layer will save you hours of cleanup down the road.
Step 6: Build the Base Using Crushed Gravel

A strong base is what keeps your putting green smooth, stable, and drainable. Use 2 to 3 inches of 3/8 minus gravel with fines—this type of compactable gravel binds together well and creates a solid foundation. Avoid using plain gravel, pea gravel, or sand. These materials won’t hold their shape, and they shift over time.
Spread the gravel evenly across the entire area using a rake or shovel. Aim for a consistent thickness so the surface is level throughout. Don’t pile too much in one spot. You’re preparing the area for compaction, so the smoother you spread it now, the easier the next step will be. Avoid shortcuts here—this layer determines how true your ball rolls and how long the turf lasts.
Step 7: Mark and Dig Cup Locations
Before laying your turf, you’ll need to decide where your putting cups will go. Cup placement affects how your green plays—so think ahead. A single cup in the center works for tight spaces, but if you have room, try spacing out two or three for better practice variety.
Use a tape measure to mark cup positions directly on the compacted gravel. Drive a landscape spike into the center of each spot so you don’t lose the location. Dig a hole deep enough to fit your putting cup—typically one full shovel scoop. Add a few inches of gravel at the bottom of each hole for drainage, and gently tamp it down.
If you’re building a larger green, you can also dig shallow trenches leading away from the cups and fill them with gravel. This helps rainwater drain faster and keeps the area dry. Just remember: cup location is permanent once the turf is down, so take your time.
Step 8: Compact and Level the Base Surface
Once the gravel is in place, it’s time to compact and level it. This step locks everything together and gives your turf a stable, even surface to sit on. If you skip or rush this part, the green may shift, sink, or ripple over time.
Use a plate compactor for best results, especially on larger areas. If you’re working with a smaller space, a hand tamper will do the job—just be patient and go over the surface several times. Avoid pressing in straight rows, which can leave tracks. Instead, move in overlapping passes. After compacting, walk across the area slowly. It should feel solid underfoot with no soft spots. Use a level or straight board to check for dips or high spots. A well-compacted base now means fewer issues later.
Step 9: Lay and Trim the Synthetic Putting Turf

Laying turf isn’t just rolling it out. You need to align it correctly, trim it precisely, and make sure the surface looks and plays right. Take your time here—mistakes will show.
Start by unrolling the turf across your compacted base. Let it sit for 30–60 minutes so it can relax and flatten out. Pay attention to the nap direction (the way the fibers lean)—ideally, the grass should lean toward your main putting direction for smoother ball roll. Align the turf edges with your layout and avoid stretching it to fit. Once it’s in place, use a sharp utility knife to trim the perimeter carefully. Cut from the back side in smooth, controlled strokes. Don’t rush—clean cuts make the final look far better. Keep any leftover turf for patches or edging.
Step 10: Secure the Turf with Landscape Staples or Pegs
Now that your turf is trimmed and aligned, it’s time to lock it in place. Securing the turf properly prevents shifting, ripples, and edge lift—all issues that can ruin how your putting green looks and plays.
Start by flattening out the turf one last time to remove any air pockets or folds. Then, use landscape staples or turf pegs to anchor the turf around the perimeter. Place staples every 12 to 18 inches along the edges, and add a few more inside the area for extra hold. Drive them in fully so they sit flush with the turf but don’t push the fibers down. Work from one side to the other, smoothing as you go. Don’t skip corners—they’re the most likely spots to peel up over time.
Step 11: Cut Holes Through the Turf for Cups

Once your turf is secure, you’ll need to cut through it to expose the cup holes you placed earlier. This step affects both how your green looks and how the ball drops—so take your time.
Start by pressing down on the turf where you marked the cups. You should feel a slight dip where the cup sits. Use your fingers to find the exact center. Then, take a sharp utility knife and cut an “X” shape over the center of each cup. Carefully lift and trim the flaps to reveal the full hole. Cut just enough to fit the cup opening—don’t overcut or slice into the edges. The opening should be smooth and flush with the cup top, allowing the ball to fall cleanly without catching on turf fibers.
Step 12: Add a Border to Contain the Ball and Enhance Look

Adding a border around your putting green isn’t required, but it makes a big difference. A border keeps golf balls from rolling off the green, protects the turf edges from wear, and gives the whole area a clean, finished look.
You have several options depending on your budget and style. Timber planks, stone pavers, or plastic edging work well for clean lines. If you want a more natural look, consider adding a strip of rough turf around the perimeter. This not only stops runaway putts but also lets you practice short chip shots. To install, either press the edging into the soil, secure it with stakes, or glue it down with turf adhesive. Whatever method you choose, take a few minutes to finish this step—it’s one of the easiest ways to make your green look and play like a pro built it.
Step 13: Test the Surface and Adjust If Necessary
Even if everything looks right, don’t skip this step—now’s the time to test how your putting green actually performs. Grab a few balls and putt in different directions. Watch the roll closely. Do they veer off? Stop too soon? Pick up unexpected speed?
If something feels off, gently lift the turf in that spot and check the gravel base. You may need to add or remove a bit of material to flatten a dip or reduce a bump. Lightly re-compact the area, then lay the turf back down and test again. Focus on spots around the cups and high-traffic areas. These small tweaks make a big difference in playability. Remember, minor adjustments are part of the process—even pros fine-tune their greens before calling them done.
Maintaining Your Artificial Putting Green
Routine upkeep is key to preserving the performance and appearance of your artificial putting green. Here are essential tips to keep it in top shape:
- Remove leaves and debris regularly
Use a leaf blower, soft rake, or stiff broom to clear off leaves, twigs, and other debris. This prevents buildup and keeps the surface clean. - Brush the turf to prevent matting
For putting greens with short nap, use a turf-safe brush (not metal) to lift the blades and keep the surface smooth. Brushing helps maintain consistent ball roll. - Rinse the surface occasionally
Hose down the area to wash away dust and light stains. For areas used by pets or with odor, apply diluted white vinegar or a turf-safe neutral cleaner. - Monitor for weed growth
Check seams and edges periodically for weed intrusion. Promptly remove any growth and re-secure loose areas if needed. - Inspect infill and surface evenness
If you used infill, make sure it’s evenly distributed. If you notice depressions or compacted spots, add infill or lightly brush the area to restore uniformity. - Check for edge or seam separation
Walk the perimeter every few weeks to confirm that seams and edging are intact. Reapply turf adhesive or staples if any sections have shifted. - Limit foot traffic during wet conditions
Allow the surface to dry after rain before walking or playing on it. Wet base layers can shift if compacted prematurely. - Protect the green from heavy items
Avoid placing furniture or equipment that could crush the turf fibers or deform the base underneath.
Conclusion: Enjoy Your Backyard Putting Green
With the right tools, clear steps, and a bit of effort, you can build a putting green you’ll use and enjoy for years. Start small, follow each step carefully, and have fun improving your short game at home.